Right after getting a new cloud server, don’t immediately disable root login or modify the firewall. The correct order is: first confirm the current session and login sources, then create a regular admin account and verify key-based login, and only at the end enable SSH hardening, Fail2Ban, and firewall rules.
This article mainly applies to modern Linux distributions using systemd. Commands center on firewalld for RHEL, Rocky Linux, AlmaLinux, and Fedora, with the corresponding operations for Debian and Ubuntu given alongside.
Keep a working serial console, VNC, or rescue mode available in your cloud provider’s control panel. When modifying SSH and the firewall, always keep the current session open and test the new configuration from a separate terminal; only close the old session once you’ve confirmed the new one can log in.
1. First, Check Who’s Currently Logged In
Before hardening anything, first confirm whether any unfamiliar sessions or source IPs exist on the server.
1.1 Viewing Current Logged-In Users and Sessions
# Currently logged-in users, terminal, login time, idle time, and source address
who -uH

# Current users and the commands they're running
w

# Login sessions managed by systemd
loginctl list-sessions

# View details of a specific session; replace SESSION_ID with the ID from the previous command
loginctl session-status SESSION_ID
who and w read login session records, good for answering “who’s currently logged in”; loginctl can additionally show the session type, whether the source is local or remote, and related processes. These may include multiple terminals for the same user, so don’t just check the username — also cross-check the source address and login time.
If you just want to check established SSH TCP connections, run:
sudo ss -tnp state established '( sport = :22 )'If SSH doesn’t use port 22, substitute the actual port. ss shows network connections, complementing who’s session records — SSH connections used for file transfer, port forwarding, etc. don’t necessarily show up as interactive login sessions.
The client IP of the current SSH session is in the first field of $SSH_CONNECTION:
printf '%s\n' "$SSH_CONNECTION"
ADMIN_IP=$(printf '%s\n' "$SSH_CONNECTION" | awk '{print $1}')
printf 'Current admin IP: %s\n' "$ADMIN_IP"
When manually banning an IP later, first confirm the target address isn’t equal to this admin IP.
1.2 Reviewing Recent Successful and Failed Logins
# Recent successful logins and reboot records; -a puts the source address in the last column, -i keeps numeric IPs
last -ai | head -n 30

# Recent failed logins, requires root privileges; some systems don't have btmp logging enabled
sudo lastb -ai | head -n 30

# View today's sshd logs from the systemd journal
sudo journalctl _COMM=sshd --since today

# Filter to just common success, failure, and invalid-user events
sudo journalctl _COMM=sshd --since today | grep -E 'Accepted|Failed|Invalid user'
If you find an unfamiliar successful login, don’t just ban a single IP. You should also immediately check ~/.ssh/authorized_keys, sudoers, scheduled tasks, systemd services, and abnormal processes, and rotate any keys or passwords that may have been leaked.
2. Create a Regular Admin Account
Logging in remotely directly as root has two clear problems: the account name is fixed, and there’s no buffer on privilege. The more robust approach is to create a regular account and only escalate via sudo when needed.
2.1 Creating the Account and Granting sudo Access
RHEL, Rocky Linux, AlmaLinux, Fedora:
sudo useradd --create-home --shell /bin/bash userA
sudo passwd userA
sudo usermod -aG wheel userA
Debian, Ubuntu:
sudo adduser userA
sudo usermod -aG sudo userA
Open a new terminal, log in as userA, and verify:
ssh userA@SERVER_IP
sudo -v
sudo id
Only if the output shows uid=0(root) does that confirm sudo is configured correctly. Don’t close the current root session before verification is complete.
If you need to configure sudoers separately, use visudo to check the syntax — don’t edit /etc/sudoers directly:
sudo visudo -f /etc/sudoers.d/userAThe syntax to grant full sudo access is:
userA ALL=(ALL:ALL) ALLPasswordless sudo makes it much easier for an attacker who steals a regular account or its SSH key to obtain root directly, so setting NOPASSWD: ALL globally is not recommended. When automated tasks genuinely need passwordless access, only grant it to fixed programs that can’t be substituted by the user or used to indirectly run arbitrary commands.
3. Set Up SSH Key-Based Login
3.1 Generating a Key on the Client
For new setups, prefer Ed25519, and set a passphrase for the private key:
ssh-keygen -t ed25519 -a 100 -C "userA@client"By default this generates the private key ~/.ssh/id_ed25519 and the public key ~/.ssh/id_ed25519.pub. The private key must never be uploaded to the server, nor sent over chat or email; it’s recommended to store the private key’s passphrase in a password manager.
3.2 Installing the Public Key on the Server
The simplest method is to run this on the client:
ssh-copy-id -i ~/.ssh/id_ed25519.pub userA@SERVER_IPIf the client doesn’t have ssh-copy-id, you can copy the public key to the server first, then run this as userA:
install -d -m 700 ~/.ssh
cat ~/id_ed25519.pub >> ~/.ssh/authorized_keys
chmod 600 ~/.ssh/authorized_keys
rm ~/id_ed25519.pub
You must use >> to append the public key; using > will overwrite any existing keys. The directory permissions should be 700, and authorized_keys should be 600.
Verify key-based login from the client:
ssh -o IdentitiesOnly=yes -i ~/.ssh/id_ed25519 userA@SERVER_IPIf it fails, add -vvv to see the client’s debug log, and check the SSH log on the server at the same time:
ssh -vvv -i ~/.ssh/id_ed25519 userA@SERVER_IP
sudo journalctl _COMM=sshd -n 100 --no-pager
3.3 Setting Up a Client Alias
Edit the client’s ~/.ssh/config:
Host cloud-server
    HostName SERVER_IP
    User userA
    Port 22
    IdentityFile ~/.ssh/id_ed25519
    IdentitiesOnly yes
    ServerAliveInterval 30
    ServerAliveCountMax 3
From now on, ssh cloud-server is enough to log in. Only enable ForwardAgent when you specifically need agent forwarding — don’t make it a default setting.
4. Hardening the SSH Service
Only after confirming key-based login for the regular account has succeeded should you modify /etc/ssh/sshd_config, or use the /etc/ssh/sshd_config.d/*.conf mechanism your distribution already has enabled:
PermitRootLogin no
PubkeyAuthentication yes
PasswordAuthentication no
KbdInteractiveAuthentication no
MaxAuthTries 3
LoginGraceTime 30
If you use AllowUsers, list every account that needs remote login — any account not listed will be rejected:
AllowUsers userAYou must check the syntax before applying the configuration:
sudo sshd -tNo output from the command means the syntax check passed. Then reload the service:
# RHEL, Rocky Linux, AlmaLinux, Fedora
sudo systemctl reload sshd

# Debian, Ubuntu usually use ssh.service
sudo systemctl reload ssh
Don’t exit the current session immediately. Open a new terminal to confirm the regular account can still log in, then use the following command to check the effective values that actually took hold:
sudo sshd -T | grep -E 'permitrootlogin|pubkeyauthentication|passwordauthentication|kbdinteractiveauthentication|maxauthtries|logingracetime'4.1 Optional: Enabling Real 2FA
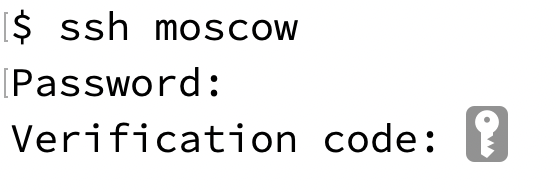
2FA should require two genuinely different factors, not a choice of “public key or verification code.” Once TOTP is configured through PAM, you can require the client to pass a public key and then an interactive verification code, in sequence:
UsePAM yes
PubkeyAuthentication yes
PasswordAuthentication no
KbdInteractiveAuthentication yes
AuthenticationMethods publickey,keyboard-interactive:pam
A comma in AuthenticationMethods means multiple verification steps must be completed in sequence, while a space would indicate different, alternative acceptable combinations. The installation of the PAM module, storage of recovery codes, and emergency-account policy vary by distribution — keep console access available before enabling this, and complete TOTP registration for every user allowed to log in beforehand.
5. Using the Firewall to Temporarily Block a Login Source
Manual banning suits an attack currently in progress, or emergency handling; sustained brute-force attempts should be handed off to Fail2Ban in the next section. Before running any of this, cross-check the IP against who, w, ss, and $SSH_CONNECTION to avoid banning your own admin address.
5.1 firewalld: Setting an Automatic Expiration Time
First confirm the active zone your network interface belongs to:
sudo firewall-cmd --get-active-zonesThe example below bans access from IPv4 address 203.0.113.10 to SSH port 22 within the public zone, and automatically removes the rule after 1 hour:
BLOCK_IP=203.0.113.10
SSH_PORT=22
ZONE=public
RULE="rule family=\"ipv4\" source address=\"$BLOCK_IP\" port port=\"$SSH_PORT\" protocol=\"tcp\" reject"

sudo firewall-cmd --zone="$ZONE" --add-rich-rule="$RULE" --timeout=1h
sudo firewall-cmd --zone="$ZONE" --query-rich-rule="$RULE"
sudo firewall-cmd --zone="$ZONE" --list-rich-rules
--timeout accepts a number of seconds, as well as the s, m, and h suffixes. This rule only exists in the runtime configuration and is automatically removed once it expires — it can’t be combined with --permanent. If you need to unblock it early, run this in the same shell:
sudo firewall-cmd --zone="$ZONE" --remove-rich-rule="$RULE"For an IPv6 address, change family="ipv4" in the rule to family="ipv6". If the server’s SSH port has been changed, update SSH_PORT accordingly too. For the rule syntax and timeout behavior, see the firewall-cmd official manual and the firewalld rich rule documentation.
5.2 UFW: Manually Adding and Removing Temporary Rules
UFW’s regular commands don’t have a rule TTL — you can insert a rule and then remove it later using exactly the same condition once the incident is handled:
sudo ufw insert 1 deny from 203.0.113.10 to any port 22 proto tcp
sudo ufw status numbered

# Remove the ban
sudo ufw delete deny from 203.0.113.10 to any port 22 proto tcp
Don’t manually maintain firewalld, UFW, iptables, and nftables rules all at the same time. Use systemctl is-active firewalld and ufw status first to determine which one is actually managing the firewall on this server.
6. Using Fail2Ban to Automatically Ban SSH Brute-Force Attempts
Fail2Ban continuously reads authentication logs, and once the number of failures within a time window exceeds a threshold, it calls the firewall to ban the source IP, automatically unbanning it once bantime expires. It reduces log noise and brute-force attempts, but it’s not a substitute for key-based authentication, timely system updates, and least privilege.
6.1 Installing Fail2Ban
Fedora, or an RHEL-compatible distribution with EPEL already enabled:
sudo dnf install fail2banIf Rocky Linux, AlmaLinux, or similar systems report the package can’t be found, enable EPEL for your specific system version first, then install Fail2Ban. Debian, Ubuntu:
sudo apt update
sudo apt install fail2ban
6.2 Configuring the sshd Jail
Don’t modify the distribution-provided /etc/fail2ban/jail.conf directly — it may get overwritten on a package upgrade. Create /etc/fail2ban/jail.d/sshd.local instead:
[DEFAULT]
ignoreip = 127.0.0.1/8 ::1
findtime = 10m
maxretry = 5
bantime = 1h
bantime.increment = true
bantime.maxtime = 1w

[sshd]
enabled = true
port = ssh
backend = systemd
If SSH uses a custom port, change port = ssh to the actual port, e.g. port = 2222. backend = systemd reads directly from the journal, and logpath should not be set at the same time.
Fail2Ban uses the default ban action configured by the distribution. If you’d like the ban to show up directly in firewalld’s rich rules, add this under [sshd]:
banaction = firewallcmd-rich-rulesIf the network interface isn’t in the public zone, first check the zone setting in the local /etc/fail2ban/action.d/firewallcmd-common.conf and override it to match your actual environment. Fail2Ban officially recommends putting local modifications in .local files rather than modifying the .conf files shipped with the package — see the jail.conf manual for details; the implementation of the firewalld action can be viewed at firewallcmd-rich-rules.conf.
6.3 Verifying and Starting
# Check the configuration; fix all errors before starting
sudo fail2ban-client -t

sudo systemctl enable --now fail2ban
sudo systemctl status fail2ban --no-pager

# View the status of all jails, and of the sshd jail specifically
sudo fail2ban-client status
sudo fail2ban-client status sshd
Keep an eye on the ban log continuously:
sudo journalctl -u fail2ban -fYou can also manually ban or unban an address through Fail2Ban to verify the entire firewall action chain:
sudo fail2ban-client set sshd banip 203.0.113.10
sudo fail2ban-client status sshd
sudo fail2ban-client set sshd unbanip 203.0.113.10
Use an address you’re certain isn’t the current admin address when testing. Don’t deliberately type the wrong password repeatedly from the only SSH source you have available.
7. Daily Checklist
After finishing initialization, confirm at least the following items:
- There are no unfamiliar sessions in
who -uH,w, orloginctl list-sessions. - The regular admin account can start a new SSH session via its key and use sudo normally.
sudo sshd -tproduces no output, andsudo sshd -Tshows root and password login are disabled as expected.- Only one of firewalld or UFW is enabled, and the cloud provider’s security group also only opens the necessary ports.
fail2ban-client status sshdshows the jail running normally, with no backend or firewall errors in the logs.- System security updates, time synchronization, and log persistence are functioning normally, and the cloud console’s rescue access is available.
Summary
Cloud server security isn’t a single SSH setting — it’s a continuous line of defense: first see clearly who’s currently logged in and connected, then reduce authentication risk with a regular account, keys, and optional 2FA, narrow the entry point through SSH configuration, use the firewall to handle urgent sources, and finally let Fail2Ban automatically respond to ongoing brute-force attempts. Every change that could potentially interrupt your remote connection should follow the order: “keep the old session open, check the syntax, verify from a new terminal.”